Preset White Balance Infra Red Photographs using Photoshop
One of the terms and conditions to shoot IR using filter is by setting the white balance (or preset WB (white balance)).
Undone or unsuccessfully WB preset on the DSLR may creating IR photographs in bright red color.
Do no't delete those photos, yet..
Nikon Capture or Adobe Photoshop are proven to be a handy software in re-touch the unwanted items in your camera.
Two main conditions in retouching IR photographs with wrong WB setting are:
1. File (s) have to be in RAW or NEF format (for Nikon cameras)
2. You have the Camera RAW for photoshop CS file(s)
Here's the How-To in setting WB using Photoshop CS:
1. Open the file RAW or NEF that you want to modify using photoshop CS.
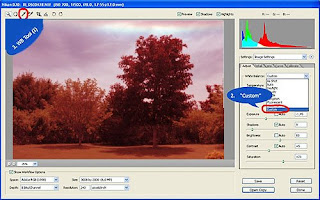
you will see the dialog box of Camera Raw as follows:
2. In White Balance dialog box, choose Custom (see picture)

3. Choose WB Tool (I) on the upper-left tool, the third one..
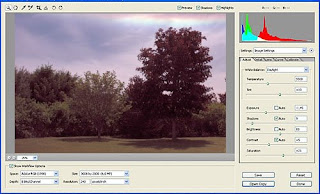
Next step is to choose the object in the photo that you want to pick as Preset WB, and click that object.
For the example, i clicked on the leaves. The red-dish color will turn into brownish, like the pic below.

4. According to my experiments, more brown the sky is, the blue it will be (after the channel swap) using channel mixer. Find your preferable tone through experiments..
5. If you haven't satisfied with the result of step 3 above, repeat it by choosing other object, such as: sky, cloud, the edge of the cloud itself, leaves, tree, etc and see the new results..
With one IR photo, we can get lots of tones only by changing the WB setting.
Hope this post can help those who have difficulties in pre-setting WB..


