2/25/2009

Preset White Balance Infra Red Photographs using Photoshop

Preset White Balance Infra Red Photographs using Photoshop

One of the terms and conditions to shoot IR using filter is by setting the white balance (or preset WB (white balance)).
Undone or unsuccessfully WB preset on the DSLR may creating IR photographs in bright red color.

Do no't delete those photos, yet..
Nikon Capture or Adobe Photoshop are proven to be a handy software in re-touch the unwanted items in your camera.

Two main conditions in retouching IR photographs with wrong WB setting are:
1. File (s) have to be in RAW or NEF format (for Nikon cameras)
2. You have the Camera RAW for photoshop CS file(s)

Here's the How-To in setting WB using Photoshop CS:

1. Open the file RAW or NEF that you want to modify using photoshop CS.
you will see the dialog box of Camera Raw as follows:


2. In White Balance dialog box, choose Custom (see picture)
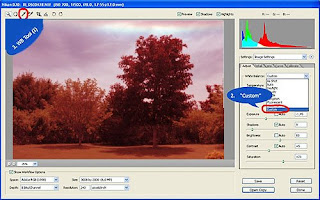


3. Choose WB Tool (I) on the upper-left tool, the third one..
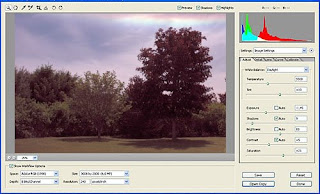
Next step is to choose the object in the photo that you want to pick as Preset WB, and click that object.
For the example, i clicked on the leaves. The red-dish color will turn into brownish, like the pic below.


4. According to my experiments, more brown the sky is, the blue it will be (after the channel swap) using channel mixer. Find your preferable tone through experiments..

5. If you haven't satisfied with the result of step 3 above, repeat it by choosing other object, such as: sky, cloud, the edge of the cloud itself, leaves, tree, etc and see the new results..

With one IR photo, we can get lots of tones only by changing the WB setting.

Hope this post can help those who have difficulties in pre-setting WB..

11/09/2008

Feedback & Questions HERE

Thank you for visiting this blog.
I'm very surprised that many people found out about this new blog.
In order to get more involved with this blog's visitors, i should be able to know what you want/need to know and help (if i could) you in digital infrared photography stuffs.
so, feel free to write inputs, comments, (especially) questions, feedback, even donation (just kidding..) to me at irphotographyblog@gmail.com
and i will respond as soon as i can. thank you again for visiting.
have a nice day :)

11/07/2008

What are the techniques used to maximize IR in photoshop?

Many photographers still edit their IR photos using photoshop..

Based on their experiences, most of the techniques they used are: (all of the techniques require at least 2 layers.. one for background)

1. to edit skin tone: color balance (masking first), change the opacity

2. to edit the background color: levels

3. "fix" the contrast: curves, hue saturation.. (many prefer curves because if you used hue saturation too much, the detail of the image would be washed out)

4. too lazy to edit: auto color


5. play around the model clothes/landscape elements color: channel mixer.. some prefer selective color

6. add the dimension: burn & dodge

7. use other unusual techniques you like.. because, if i may quote,
"Photographs in infrared show quite unusual tonality, different than that to which we are used, and this may make them esthetically pleasing, at least in many cases. Which, of course, is a matter of taste."

List of Lenses which produce Hot Spot


Nikkor :
  • Ai-S 18 mm f/3.5 Nikkor
  • Ai-S 20 mm f/2.8 Nikkor
  • Ai-S 24 mm f/2.8 Nikkor
  • Ai-S 28 mm f/2 Nikkor
  • Ai-S 35 mm f/1.4 Nikkor
  • Ai-S 35 mm f/2 Nikkor
  • PC 35 mm f/2.8 Nikkor
  • Ai-S 25-50 mm f/4 Nikkor

Canon :
  • EF-S 18-55mm F/3.5-5.6 - often
  • Canon EF-S 10-22mm/3.5-4.5 USM -> need clarification
  • Canon EF 20 mm f/2.8
  • Canon EF 24 mm f/2.8
  • Canon EF 50 mm f/1.4
  • Canon EF 50 mm f/2.5 macro
  • Canon EF 85 mm f/1.8
  • Canon EF 16-35 mm f/2.8 L
  • Canon EF 24-85 mm f/3.5-4.5 USM
  • Canon EF 28-70 mm f/2.8 L
  • Canon EF 35-80 f/4.0-5.6
  • Canon EF 70-200 mm f/2.8 L IS
  • Canon 200/2.8L produces a hot spot after f10-f11

Tokina :
  • AF 12-24mm f/4 124 AF Pro DX

Sigma :
  • 12-24mm F/4.5-5.6 EX DG ASPHERICAL HSM (sweetspot)
  • sigma 10-20 (sweetspot)
  • Sigma 18-50mm f/2.8 EX DC
  • Sigma 30 mm f/1.4
  • Sigma 70-200 mm f/2.8

Tamron :
  • SP AF17-50mm F/2.8 XR Di II LD Aspherical [IF]
  • Tamron SP AF 24-135 mm f/3.5-5.6 AD aspherical macro
  • Tamron AF 70-300 mm f/4.0-5.6 LD macro
  • Tamron 17-35 mm f/2.8-4.0 SP AF Di
  • Tamron 18-200 XR Di II LD Aspherical [IF]
  • Tamron SP AF28-75/2.8 XR Di LD Aspherical (IF)

Olympus :
  • Olympus Zuiko 14-42mm f/3.5-5.6

Carl-Zeiss :
  • Carl Zeiss Planar T* 50 mm f/1.4 (for Contax)

IR using Nikon D40x + filter Hoya r72

Question: i have nikon D40 + filter hoya r72..
if i want to avoid the darkness of the image, how to set the speed (minimum) ??

Answer:
using D40, you should set the settings to RAW, add tripod, software nikon capture NX, and NOISEWARE, well, and photoshop..

to avoid dark image, first, shoot at the place with enough level of sun light.. (d'oh)..
set the speed at 1/10.

set wb to auto.. it's the best if you're using nikon d40/x

don't be dissapointed if the result (your photo) turning into red, cause there's nikon capture for fixing the white balance..

then, set wb using grey point (in nikon capture NX).. the result would turned into absolute darkness.. raise the level of exposure to 0.5..

after that, save as at the max quality (jpeg format)..

open the file using photoshop..
raise the level of exposure +1..

then, you play the colour using channel mixer..

hope this could help..

*